Introduction
We will be addressing persistent data storage in the modern HANA platform. How are tables created in XSA? What role do HANA Deployment Infrastructure (HDI) containers play in this respect? What are the advantages of SAP’s Cloud Application Programming Model (CAP)? We will answer these exciting and essential questions with the help of an example project which we have created in the Business Application Studio (BAS).
HDI Containers
Based on our first blog, we know that the introduction of XSA resulted in a fundamental paradigm shift in creating native HANA models. The approach of a central (database-focused) system is giving way to a cloud-focused system with separate applications and dedicated services. But how are applications separated, exactly?
In a classic XSC HANA model, the design-time objects (Calculation Views, TableFunctions) are stored in packages, and the runtime objects are centrally located in a schema. In the new XSA landscape, the Designtime objects are managed using Git, whereby each developer works with their local copy. The runtime objects are in HDI containers.
An HDI container is a combination of 3 schemas:
Figure 1 – Structure of an HDI Container
Each XSA project with persistent data storage defines (at least) one HDI container in which the new objects are created. Default authorizations are assigned such that a HDI container only knows itself and does not see other HDI containers, and therefore has no access to their data; this is a consequence of the isolated application approach. Connections to other HDI containers must be created manually.
Each developer works with his own HDI containers: as a default, a suffix with an ascending number is added to the end of the HDI containers, e.g. MY_HDI_1. With to the build of the individual artifacts, they are created in the personal copy and can be developed and tested in isolation. Only when the entire project is deployed, the actual HDI container is adjusted.
It is important to understand that upon deployment (after development), the project (as an application) represents a unit. All objects in an HDI container are deployed; restriction to individual artifacts is not possible. In general, the system checks whether an artifact was adjusted, and ideally changes only the affected runtime objects.
Due to the isolated structure of the HDI container, it is not a good idea to make these too small. Communication with other containers requires a certain setup and manual maintenance (roles, grants, synonyms). In addition, certain artifacts such as triggers require dependency of the artifacts upon deployment, so that they cannot be assigned to any desired containers. Based on past projects, it is recommended to bundle the required tables and objects for data loading (procedures, flowgraphs) in one single container.
Persistence and CAP
One artifact is responsible for persistence in XSA: .hdbtable. This is a SQL “CREATE” command for a database table. This artifact is used to create or adjust the corresponding tables in the HDI container during the Build or Deploy process.

Figure 2 – Example .hdbtable
NodeJS with JavaScript is responsible for managing the HDI containers and artifacts in the background of XSA. This is comparable to the integral role of ABAP, for instance in an S/4HANA or BW/4HANA system. As is typical for NodeJS, the individual files are managed in NPM packages. NPM can be seen as a central library for reusable JavaScript programs.
Therefore, an XSA project is actually a new NPM package, set up with packages for creating and managing HDI containers, services, and artifacts. All relevant commands can be entered directly via the console in the Business Application Studio (BAS). Many frequently used tasks, however, are already offered via the GUI.
At this point, the Cloud Application Programming Model (CAP) comes into action. This is a framework consisting of programming languages, libraries and tools for creating services and models. The focus is not on technical details, but rather on the intention for what the model and entities should represent, and their behavior in case of changes. CAP offers Core Data Services (CDS) for a persistent model.
Essentially, CDS offers the ability to model entities, whereby so-called associations and compositions represent the relationships between the entities. CDS offers significantly more functionality, but here we will focus on the definition of persistent structures.
There are two options for creating persistent objects in XSA: direct creation of .hdbtable files, which are similar to SQL and correspond to classic database models. The other option is to use .cds files that work with CDS and CAP. The command “cds build” is used to convert these to .hdbtable files, that can be deployed.
As is often the case, both approaches have advantages and disadvantages. Direct creation of .hdbtable files works more on the database level, and offers a highly technical focus in modeling. CDS, in contrast, can be used to add more semantics to the model, which can be read out via an OData Service.
To help you better understand these new terms and concepts, we will demonstrate them using an example BAS project.
Example project – Setup
A BTP account with HANA Cloud instance and set up BAS are required for the example project. All required components are part of the BTP Trail account, which can be obtained free of charge. Setting up these components is not covered in this blog post, however there are many sources that describe the required steps.
The BAS development environment and installed SAP packages will change over time due to updates, so the menus or commands may look different in the future. First, we created a CAP project using the Template Wizard without additional files.

Figure 3 – Creating a CAP project
Here, we recommend connecting the XSA project to a Git Repository. This allows all changes to be tracked throughout the project, and save historical copies of the files.
We need a DB module for the persistent artifacts, which can be set up in different ways. One simple option is to delete the existing (empty) “db” folder. The command “cds add mta” can be executed via a terminal, so that a mta.yaml file is created that can be seen as a central control file for all modules.
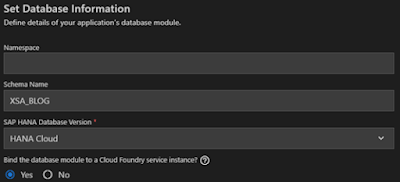
We can right click the mta.yaml file to insert a DB module via a wizard, which we will name “db.” In addition, we want to define the schema name, which we can do on the next page of the wizard.
Figure 4 – Creating a DB module
The last option is important, which asks about connecting a service instance. The term “Service” is a very broad one in the BTP environment. In our case, this service is the corresponding HDI container that is created by the DB module. However, an HDI container and service key can also be set up and connected to our development via terminal commands. But the wizard will handle this for us.
After creating the DB module, we need to make two further adjustments to use CDS. First, we have to install the required NPM packages. We do so using the following command in the root directory for the project.
npm install
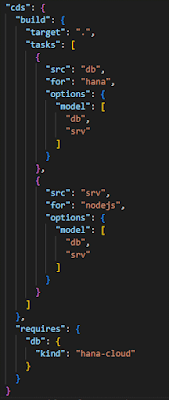
In addition, we want to configure CDSt, so it fits our developments better. To do so, we insert the following parameters for CDS in the package.json:
Figure 5 – Adjustment to package.json
Normally, the .hdbtable files are created in a separate “gen” folder. In our project, however, we want to have the generated files directly under the “db” folder. We make this change by defining the “build” parameter. The bottom “requires” command defines that we want to have .hdbtable artifacts. In the past, .hdbcds files were also possible.
Example project – CDS data model
To use CDS, we need a “.cds” artifact. Similar to an SQL CREATE command, the structures are defined via a separate syntax. In addition to classic entities, reusable types or characteristics are also possible. In contrast to the .hdbtable files, we can combine multiple tables in one file with CDS. Therefore, first we create a “schema.cds” file under the “db” folder.
SAP offers standard entities and definitions for CDS that should be used. Tables for language, currencies or countries are provided, as well as other characteristics like unique IDs. The file is in the corresponding NPM package and can be read out using the following syntax.

Figure 6 – Reusing SAP standards
This is based on the “require” from JavaScript and describes which entities from a file are used. In larger models, it is a good idea to keep your own entities in multiple files and combine these in a central file.
It is customary to use so-called “namespaces” for the structure of artifacts. These are prefixes for the tables so that they are easier to identify. In our example, all we need are the master data for the customer and material, as well as two transactional tables for invoice headers and items.
We will start with the master data for customers and materials. We cannot explain all the fundamental principles and details for CDS here, so we will just address some specific features
◉ SAP recommends using UUIDs as unique keys
◉ Aspects can be reused by naming them after the “:”
◉ Associations define relationships between the entities, similar to database joins
◉ When listing characteristics, such as e-mail addresses, it is a good idea to use arrays so that the content can be saved as a JSON file

Figure 7 – Master data
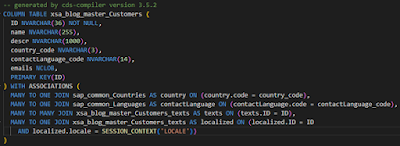
The corresponding .hdbtable files can be generated using the command “cds build”. The created files are located under “db/gen”. Looking at the customer file, it quickly becomes clear that CDS automatically assigns many definitions, depending on the specifications.
Figure 8 – Generated .hdbtable file
In addition to the master data, we want to define the transactional tables in the next step. Types and aspects help in reusing components. Compositions are similar to associations.
Figure 9 – Transaction data
After the entries in the schema.cds file are created, we can generate the .hdbtable files using the command “cds build.” We recommend using the BAS GUI to actually create the tables in the HDI container. You can use the rocket symbol here in the menu for SAP HANA Projects. This will cause the JavaScripts to start in the background, which take the definitions from the .hdbtable files and convert them to runtime objects on the database.
Figure 10 – Deploy
Now the structures can be checked directly on the database. The HANA Database Explorer integrated into the BAS can be used for this purpose, or the separately available Database Explorer from the BTP, which currently offers the most functions.
However, as is so often the case, one important aspect of the model is missing: data. In the last section of this blog, we will look at how to easily create test data for a model.
Example project – data
XSA offers the option of easily filling existing tables with data. To do so, you will need a csv file and another artifact: hdbtabledata. The metadata to import the data are defined in this file: the name of the csv file, name of the table, name and sequence of columns. These files can be created manually, as can the .hdbtable artifacts. However, CDS is useful here as well.
To deliver data via CDS, all you need is the corresponding csv file in a “csv” sub-folder directly under the “db” folder. The file is created there with the same name as the table and filled with data. The following example applies to the customer table:

Figure 11 – CSV file for customers
No other files are required, since CDS handles the rest here. If the “cds build” command is executed once again, an .hdbtabledata file is created automatically. The next time the deploy command is executed, in turn, the content of the csv file is written automatically into the table.
In the December 2022 release for CAP, SAP is providing a new package that contains example data for the standard tables. To use these in our project, we integrate the package via “npm add @sap/cds-common-content –save.” We also add the following lines to our schema.cds file
This causes the CSV files provided by SAP to be used automatically during the next build and deploy, and our tables to be filled out with countries, currencies, and languages.


No comments:
Post a Comment