I’m writing this blog in regards to the SAP HANA Lifecycle Management tool in SP8, hdblcm (SAP Note 1997526). The plan for this blog is to initially post about installing HANA (and components) using hdblcm (also taking a detour to add a node) and then when SAP HANA SP9 comes out I will upgrade using the new hdblcm that comes with SP9.
So where is the hdblcm tool? this is found in the install media (if this is downloaded from the SAP Service Market Place you will need to have SAPCAR on your system to un-archive this file). It can be started in two ways, by calling ./hdblcm or ./hdblcmgui.
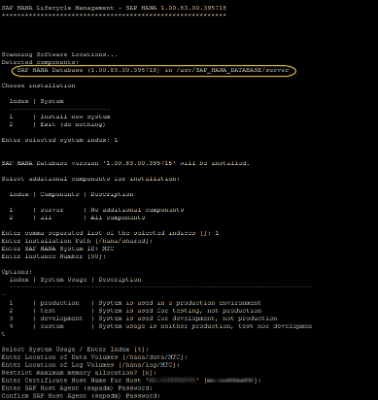
With hdblcm you can run it in a batch mode, so that you can just pre-enter the values, or interactive mode (in these caps I am using interactive mode). In the following captures please note the highlight ‘Detected components’ area as I only have the server file un-archived, later I will have more files un-archived.
So where is the hdblcm tool? this is found in the install media (if this is downloaded from the SAP Service Market Place you will need to have SAPCAR on your system to un-archive this file). It can be started in two ways, by calling ./hdblcm or ./hdblcmgui.
Command Line Installation and Updates
With hdblcm you can run it in a batch mode, so that you can just pre-enter the values, or interactive mode (in these caps I am using interactive mode). In the following captures please note the highlight ‘Detected components’ area as I only have the server file un-archived, later I will have more files un-archived.
After the installation is complete I un-archived my other SAR files and re-ran ./hdblcm
We see that the system I just installed is present and available to update (indicated by the red arrow) also notice the other detected components. If you are not seeing your components you can set the component location by using one of the following options:
--component_dirs=<path1>[,<path2>]... Component directories
--component_medium=<dvd_path> Location of SAP HANA installation medium
--component_root=<path> Directory including sub-directories to search for components
In this example I decide to install the HANA client
Installation and Updates Via the GUI
When you choose to run hdblcmgui it will look like this upon loading (please note I ran this post HANA installation)
*Note that there is an ‘Add Component Location’ button
I will first go over the screens for installing a new SAP HANA database
Next you would select if this will be a multi-host or single-host system (in this blog I chose to do a Single-Host System)
These caps show just updating the existing system
Adding A Host Via HDBLCM
To add a host to your system you can use HDBLCM, either through the GUI or the command line (in this document I will show it via the command line)
Call ./hdblcm –addhosts=<server name>
You can optionally specify more servers, group, role, and storage partition
For information on the options available please refer to the SAP HANA Admin guide or run
./hdblcm –action=add_hosts --help
In this this demo I will be specifying the role
From this list select 1 to add the host, you will then be prompted to enter in the server information
After agreeing to continue the prompt will look like this:
As noted before, I'll write a second part to this as I venture to SP9
Source: scn.sap.com


No comments:
Post a Comment